CKEditor Toolbar anpassen
Prinzipiell ist es ziemlich einfach, die CKEditor Toolbar anzupassen; allerdings ist es dazu notwendig, sich mit dieser Konfigurationsoption zu befassen. In diesem Artikel geht es nur darum, wie man die geänderte Konfiguration in BlackCat verwendet, _nicht_ darum, wie man die Toolbar anpaßt.
Referenz: http://docs.ckeditor.com/#!/guide/dev_toolbar
Im Verzeichnis
<CAT_PATH>/modules/ckeditor4/ckeditor/custom
befindet sich eine Datei
config.js
Diese beinhaltet zwei vorkonfigurierte Toolbars „Smart“ und „Simple“. Hier kann man nun entweder die vorhandenen Toolbars anpassen, oder weitere hinzufügen.
Hier ein Beispiel:
CKEDITOR.editorConfig = function( config ) {
	// Define changes to default configuration here.
	// For the complete reference:
	// http://docs.ckeditor.com/#!/api/CKEDITOR.config
    config.toolbar_Smart =
        [
            { name: 'line1', groups: [ 'undo', 'font' ], items: [ 'Undo', 'Redo', 'Format', 'Font', 'FontSize', 'Styles', '-', 'About', 'Source', '-', 'Maximize' ] },
            '/',
            { name: 'line2', items: [
                'Bold', 'Italic', 'Underline', 'Strike', '-',
                'Subscript', 'Superscript', '-',
                'JustifyLeft', 'JustifyCenter', 'JustifyRight', 'JustifyBlock', '-',
                'Outdent', 'Indent', 'Blockquote', '-',
                'TextColor', 'BGColor', '-',
                'BulletedList', 'NumberedList', '-',
                'Link', 'Unlink', 'Anchor', 'Image', 'cmsplink', '-',
            ]}
        ];
    config.toolbar_Simple =
        [
            { name: 'line2', items: [
                'Bold', 'Italic', 'Underline', 'Strike', '-',
                'Subscript', 'Superscript', '-',
                'JustifyLeft', 'JustifyCenter', 'JustifyRight', 'JustifyBlock', '-',
                'Outdent', 'Indent', 'Blockquote', '-',
                'TextColor', 'BGColor', '-',
                'BulletedList', 'NumberedList', '-',
                'Link', 'Unlink', 'Anchor', 'Image', 'cmsplink', '-',
            ]}
        ];
    config.toolbar_Tiny =
        [
            { name: 'line1', items: [
                'Undo', 'Redo', 'Bold', 'Link', 'Unlink', 'Image', 'HorizontalRule', 'Table', 'cmsplink', 'BulletedList', 'NumberedList', 'Source', 'Maximize'
            ]}
        ];
};
Hier wurde nun die Toolbar „Tiny“ hinzugefügt. Diese sieht hinterher so aus:

Um diese Toolbar im Backend unter Admin Tools –> WYSIWYG Admin auswählen zu können, ist noch ein kleiner Eingriff in der Datei
<CAT_PATH>/modules/ckeditor4/c_editor.php
nötig. Hier sind nämlich die bekannten Toolbars gelistet:
    public function getToolbars()
    {
        return array( 'Full', 'Smart', 'Simple' );
    }
Hier kann man nun einfach die neue Toolbar anhängen:
    public function getToolbars()
    {
        return array( 'Full', 'Smart', 'Simple', 'Tiny' );
    }
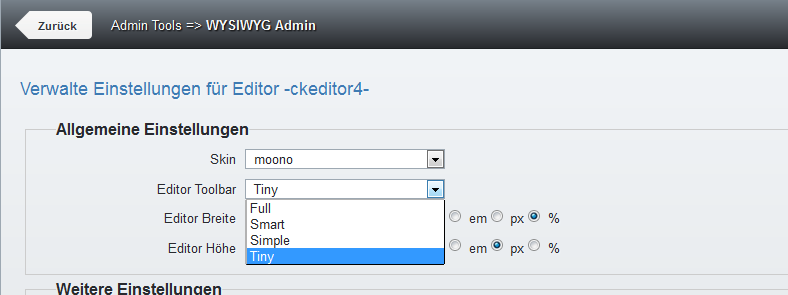
Jetzt kann man die neue Toolbar im WYSWIYG-Admin auswählen und somit aktivieren:

Das ist schon alles!